Paper (dead trees) is not the best format to publish video content, but one doesn't always choose her medium. In this post, I will explain how I used FFmpeg and ImageMagick to convert a small video sequence into a superposition of pictures with varying hue and opacity. Apart from figuring out the appropriate command lines, what I found interesting here is the progression from command line to shell script, Makefile, and then some Python scripts. The result is a quick-and-dirty pipeline: a one-shot solution that I can save and reconsider later, if needed.
Swinging a pendulum
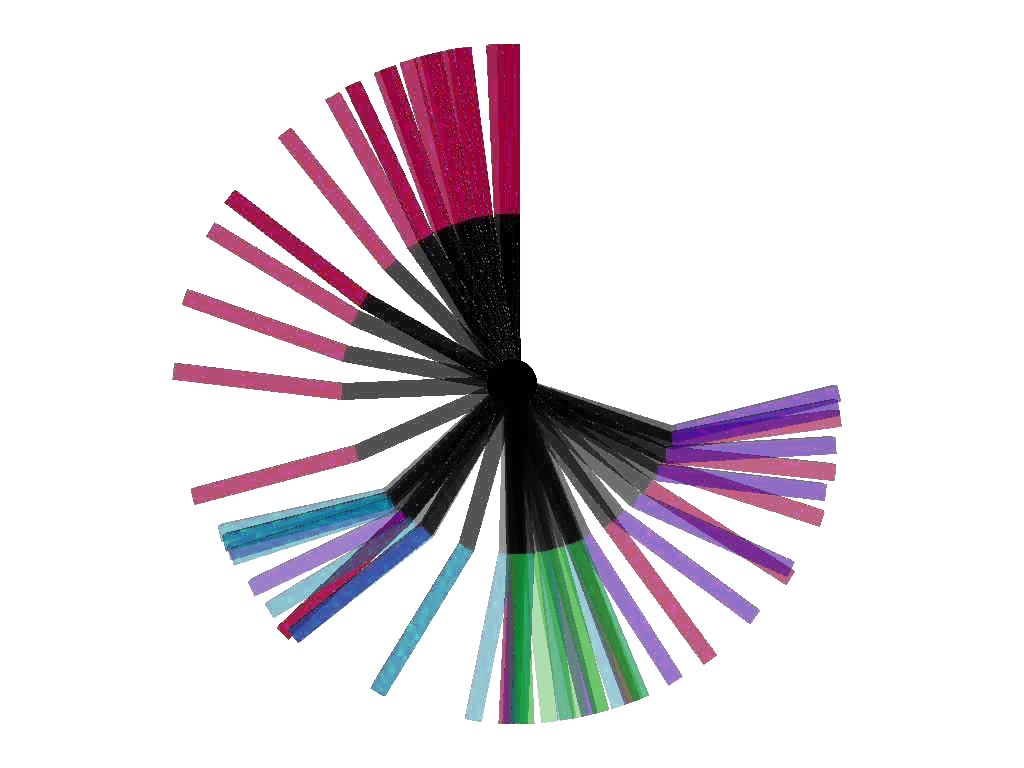
So I had this one-second video showing a pendulum swing up in four successive swings. I chose to convert it to a single picture in the following way:
- the center of the pendulum is fixed (at the center of the picture);
- opacity (alpha channel) goes from 30% to 100% at time goes by;
- the hue of the pendulum changes during each of the successive swings.
You can see the result below: the pendulum first goes right (green), then left (blue), then further right (magenta) and finally all the way up (red).
Extracting video frames
A single call to FFmpeg does the trick:
$ ffmpeg -i video.mpg -ss 00:00:00.500 -r 24 tmp/image-%3d.jpg
The -r argument indicates the frame rate, here 24 fps, while -ss
specifies when to start in the sequence using the format hh:mm:ss[.xxx]
(here, I skipped the first half second). All pictures will be saved using the
pattern format supplied in the last argument, which is a printf format
string ("%3d" means three-digit integer, so the output images will be saved
as tmp/image-001.jpg, tmp/image-002.jpg, and so on).
Transparency
All my frames had a white background. I needed to make it transparent so
I could layer frames on top of each other, which can be done using the
convert tool from ImageMagick and a simple sheel loop:
for i in tmp/image-*.jpg; do
    convert $i -fuzz 5% -transparent white ${i/jpg/png}
done
The MPEG format uses JPEG for image compression, but JPEG does not support
transparency, so the pictures here are converted to PNG (using the shell
construct ${variable/pattern/replacement}, see the Advanced Bash-Scripting
Guide). The -transparent argument is used to set the transparency color,
white here. Since my frames were dirty, the background wasn't exactly white
(RGB 255, 255, 255), so I added the -fuzz argument to specify a 5%
tolerance.
Makefile
It took me some time to figure out the right calls to convert. After
several devastations of my pictures folder, I figured out I ought to automate
the process of starting again from the beginning, so I put everything in
a Makefile:
SHELL=/bin/bash  # otherwise Make uses /bin/sh
WORKDIR=./tmp
VIDEO=output.mpg
FRATE=24

all: clean ffmpeg transparency

$(WORKDIR):
    mkdir $(WORKDIR)

clean: $(WORKDIR)
    find $(WORKDIR) -mindepth 1 -delete

ffmpeg: clean
    ffmpeg -i $(VIDEO) -r $(FRATE) -ss 00:00:00.550 $(WORKDIR)/image-%3d.jpg

transparency:
    for i in $(WORKDIR)/*.jpg; do \
        convert $$i -fuzz 5% -transparent white $${i/jpg/png}; \
    done
    rm -f $(WORKDIR)/*.jpg
Crossing the alpha channel
The next step was to set the opacity of pictures in the working folder from 30% for image-001.png to 100% for the last one. Since it involves computing a fraction for each file, I thought a small Python script would be a good way to go:
import os
import sys

src_dir = sys.argv[1]
all_files = os.listdir(src_dir)
nb_files = len(all_files)
min_alpha = 30.  # %

for i, fname in enumerate(sorted(all_files)):
    alpha = min_alpha + i * (100. - min_alpha) / nb_files
    fpath = os.path.join(src_dir, fname)
    cmd = "mogrify -alpha on -channel a -evaluate and "
    cmd += "%02d%% %s" % (alpha, fpath)
    os.system(cmd)
    print cmd
I guess one can perform the same operation within the command line, but I don't
have sufficient shell proficiency to do it ;) Here, I called mogrify,
which is the same as convert but stores the result in place instead of
saving it to a seperate output file. The call for each file is
mogrify -alpha on -channel a -evaluate and XX image.png
Where XX goes from 0% to 100%. -alpha on turns on the alpha channel,
while -channel a selects it. -evaluate specifies a pixel-wise
operator: for instance, -evaluate set 50% means you set all pixels'
alpha values to 50%. However, we previously set a transparent background here:
using set would override it and put a semi-transparent white instead.
With and, 0% (transparent) stays 0%, and 100% (opaque) becomes the new
value.
Hue make me feel
For this operation, I needed to set the hue of the picture based on its position in the sequence: after identifying (manually) the key frames at which I wanted the hue to change, I resorted to a small Python script again:
import os
import sys

key_frames = [10, 24, 37]

src_dir = sys.argv[1]
all_files = os.listdir(src_dir)
nb_files = len(all_files)

key_files = ["image-%03d.png" % fid for fid in key_frames]
print key_files
hue_step = 120 / len(key_files)
hue = 0

for i, fname in enumerate(sorted(all_files)):
    alpha = i * 100. / nb_files
    fpath = os.path.join(src_dir, fname)
    outpath = os.path.join(src_dir, fname + '.hued')
    cmd = "convert -modulate 100,100,%d %s %s" % (hue, fpath, outpath)
    os.system(cmd)
    print cmd
    if fname in key_files:
        hue += hue_step
Again, shell power users, feel free to let me know how to do it in Bash/Zsh :)
Merging all frames
The command line to merge all layers into one is the following:
convert tmp/image-* -background none -compose dst_over -flatten output.png
The two important parts are the compose method, -compose dst_over,
which merges files atop each other in the order of the list (first ones going
under), and -flatten, which merges all layers into one.
It's the final Makefile
My final Makefile looks like this:
SHELL=/bin/bash  # otherwise Make uses /bin/sh
VIDEO=output.mpg
FRATE=24
WORKDIR=./tmp
OUTPUT=pendulum_traj.png

clean:
    rm -rf $(WORKDIR)/

ffmpeg: clean
    mkdir $(WORKDIR)
    ffmpeg -i $(VIDEO) -r $(FRATE) -ss 00:00:00.550 $(WORKDIR)/image-%3d.jpg

transparency:
    for i in $(WORKDIR)/*.jpg; do \
        convert $$i -fuzz 30% -transparent white $${i/jpg/png} \
    done
    rm $(WORKDIR)/*.jpg

alpha:
    python alpha.py $(WORKDIR)

all: clean ffmpeg transparency alpha
    python hue.py $(WORKDIR)
    convert $(WORKDIR)/image-*.hued -background none -compose dst_over -flatten $(OUTPUT)
    rm -f $(WORKDIR)/*.hued
Now that I look back on it, I find this whole pipeline follows the quick-and-dirty principle: build incrementally, only go to the higher level of complexity when needed. It also follows from my laziness: don't plan ahead, crawl the Internet for the answer (command line) when needed, don't think, drink coffee, crawl the Internet even more frantically, and so on.
PS: Unnecessary loops
An acute reader pointed out that the for loops that I have used here are
unnecessarily complicated: both convert and mogrify have a
-format argument that can be used to treat all files in a single call.
For instance,
for i in tmp/image-*.jpg; do
    convert $i -fuzz 5% -transparent white ${i/jpg/png}
done
Becomes:
convert -format png -fuzz 5% -transparent white tmp/image-*.jpg
Discussion 
Feel free to post a comment by e-mail using the form below. Your e-mail address will not be disclosed.